When you’re heading out on a long trip in a truck, one of the most important things to check is your air brake system.
These brakes help stop heavy trucks safely, and if they don’t work right, the results can be dangerous — not just for the driver, but for everyone on the road.
If your air brakes fail or lose pressure, you could face brake lag, slower stopping time, or even total brake failure.
And in bad weather or on rough roads, poor traction adds to the risk. That’s why truck drivers should not only check their brakes, but also carry proper traction aids like TruckClaws, which help when tires spin or get stuck in mud, ice, or snow.
Staying safe means doing a proper brake check and being ready for whatever the road brings. Here’s a complete guide to making sure your air brakes — and your vehicle — are road-ready before the next haul.
Air brakes are different from the ones in small cars. In big trucks, they use spring brakes that stay locked until enough air pressure (PSI) is built up.
This means the brakes are “on” by default, and air is needed to release them so the truck can move. That’s why your truck won’t go anywhere if the air system isn’t working properly.
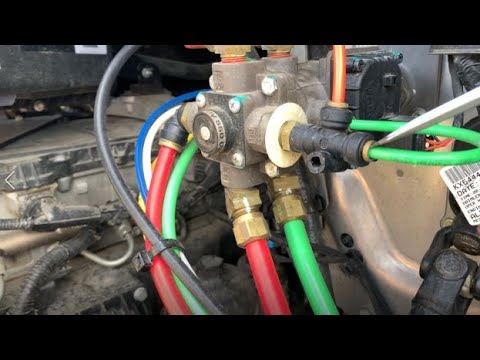
The heart of this system is the air compressor. It pumps air into air tanks, which store pressure.
This air then flows through air lines and fills up the brake chambers. Inside these chambers are push rods, which move when the air enters. These rods then push parts connected to the wheels, making the brakes work.
Slack adjusters help control how far the push rods move. If they’re not set right, the brakes might not work well or could wear out early.
That’s why the FMCSA (Federal Motor Carrier Safety Administration) requires regular checks of all these parts during pre-trip inspections.
Before moving the truck, begin with a full visual inspection of air brake components. This step helps catch problems early and ensures the brakes work safely throughout the haul.
Start by checking the air lines, air tanks, and brake chambers. Look for any signs of leaks, rust, dents, or damaged fittings. Even a small leak can affect air pressure and reduce braking power.
Next, inspect the brake drums or rotors for wear or cracks. Damaged drums can lead to weak braking. Check the slack adjusters for visible damage or cracks, which may affect brake adjustment.
Look closely for chafing or rubbing in the air lines. Also, confirm that all air fittings and clamps are secure.
This inspection should be done before every long trip to prevent breakdowns and stay compliant with FMCSA safety standards.
Once the visual inspection is complete, start the truck and allow the air pressure to build up. Monitor the pressure gauge carefully as it climbs.
To pass the air pressure build-up test, the system should go from 85 to 100 PSI within 45 seconds at a fast idle (around 1,200–1,500 RPM). This indicates that the air compressor is working properly.
Next, perform the static leakage test:
The pressure loss must be within FMCSA limits: no more than 3 PSI in one minute for single vehicles and 4 PSI for combination vehicles. Any higher loss indicates a potential air leak.
Test the low air pressure warning system. This should activate (light or buzzer) when pressure drops to below 60 PSI. If it doesn’t trigger, the vehicle is unsafe to drive.
Continue to bleed off pressure and confirm that the spring brakes engage automatically, usually around 20–40 PSI. This fail-safe ensures the vehicle stops in case of major air loss.
This step is critical for both DOT inspections and safe driving on long hauls.
Including this test in your pre-trip check helps prevent brake failure and ensures compliance with air brake leakage test procedures.
Proper brake adjustment is critical to ensure your air brakes engage efficiently and safely during operation. This involves checking push rod travel and inspecting the slack adjusters.
If you have manual slack adjusters, follow these steps:
Most modern trucks use automatic slack adjusters (ASAs) which adjust themselves during brake application.
These should not require regular manual adjustment unless there’s a malfunction. If an ASA seems consistently out of spec, it may need to be replaced.
Regularly performing the brake adjustment test ensures braking reliability and helps stay compliant with DOT brake inspection standards.

Once the air brake system has passed the stationary checks, it’s essential to verify braking performance during motion.
These in-motion brake tests confirm whether the service and trailer brakes are responding correctly under normal driving conditions.
These signs may indicate worn brake components, air pressure problems, or incorrect adjustment.
Some modern commercial trucks like Scania are equipped with ABS sensors, electronic brake monitoring, and dashboard alerts that can detect:
These alerts can serve as early warning systems, allowing drivers to address brake issues before a full failure occurs.
These tests are crucial for driver safety, trailer stability, and meeting DOT inspection requirements on the road.
Before hitting the road, your final brake inspection steps are just as important as the earlier ones.
These last checks ensure the entire brake system is functioning safely and is DOT-compliant — reducing risks during the haul and helping you pass random roadside inspections.
Keeping a printed or digital brake inspection checklist helps ensure nothing gets missed and serves as proof of due diligence — especially useful during CDL tests, DOT audits, or random inspections.
Failing to complete a full air brake inspection could result in:
Following FMCSA regulations for brake inspections not only improves safety but protects your CDL license and carrier score.
A few minutes spent here can prevent hours of trouble on the road.
Even with perfectly working brakes, traction failures on icy, muddy, or snowy terrain can leave your truck stuck — especially in remote areas or during harsh weather.
Brakes stop your truck, but traction keeps it moving. That’s where having the right gear becomes critical.
Long-haul drivers often prepare for mechanical breakdowns but underestimate traction loss. Common scenarios include:
TruckClaws are emergency tire traction aids designed to help commercial and off-road vehicles regain grip quickly when stuck.
“Unlike bulky recovery boards, TruckClaws install in minutes, offering a compact and effective solution for getting unstuck without towing.”
| Tool | Setup Time | Storage | Effectiveness |
| Tire Chains | High | Bulky | Excellent (but pre-installed) |
| Recovery Mats | Medium | Bulky | Situational |
| TruckClaws | Low | Compact | High (when stuck) |
Every smart trucker carries:
Having traction recovery tools is not just about convenience — it’s about safety, time savings, and independence when you’re far from assistance.
Air brake checks aren’t just another item on your to-do list — they’re a critical safety measure that can save lives. Whether you’re hauling across states or making local deliveries, reliable brakes and smart preparedness are your first line of defense.
Make this full inspection a non-negotiable part of your pre-trip checklist. Your safety, your cargo, and every life on the road depends on it.
Stay alert. Stay equipped. Stay road-ready.